Martin
I think that we can try to use this thread - it will force us to keep 'to-the-point'.
I will send you a postal address by mail.
As you will start with the simulator, I'll just remark on the first point for the moment.
I suggest not changing anything in the project set up but 'migrate' from an existing chip to the new chip as follows:
1. Copy an existing hardware directory (eg.
Hardware\LPC23XX to
Hardware\Rabbit)
2. Rename the relevant file in that directory to the new chip (eg.
LPC23XX.c to
Rabbit.c,
LPC23XXSim.c to
RabbitSim.c)
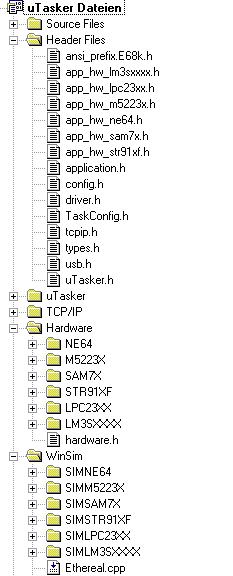
3. In the VS project add new project directories for the new chip (at the bottom is a screen shot of my project with all supported chips in it as reference - the new chip should have its own hardware and WinSim (virtual) project directory, although all files are actually in the single new folder.
4. In the application directory make a copy of
app_hw_lpc23xx.h and rename it to something like
app_hw_rabbit.h5. In VS add a build configuration for the new chip (again basically a copy of existing build), declaring a project define like
_RABBIT rather than
_LPC23XX6. In all your new files replace the define
_LPC23XX by
_RABBIT.
In config.h add a new block for the rabbit (containing heap size, TICK resolution and processor/board details - mainly the name for the simulator)*1Now you should be able to build and run the project. This is using the new files but the original (LPC) content.
The idea is now to replace parts of the new code, step-by-step, with code for the new chip. Parts which have not yet been 'migrated' will run and simulate with the old chip code so the complete project should in fact always run in the simulator. To run on the target you can strip out some defines as you suggested and also reduce the task table to simply the watchdog task - linking some driver code from the other chip should not harm since it will not actually be executed.
7. The first goal is to get the
TICK operating. If you start the simulator and step through the code you will see what happens, what is performed with the previous hardware and so what is required from the new hardware (this assumes that you have and assembler startup code for the new chip which will at least jump to the first C-code, since this is not simulated).
The sequence is (based on LPC23XX)
-
fnInitHW(), which configures the PLL, MAM, ports, default vector table, (initialises RAM variables if GNU), and conditionally the Watchdog operation.
-
fnInitialiseHeap() is a tricky one which is compiler dependent due to the ram location as discussed previously. Note that it fills all RAM from the top of heap to the top of stack with a pattern which is later used to measure the stack use.
-
uTaskerStart(). This is hardware-independent code but does call
fnStartTick() at the end, which is where the ticker needs to be confured. You will find that this jumps into your new
rabbit.c HW code and you need to configure the- Rabbit HW to generate the TICK (including setting up interrupts).
8. The simulator (and target) will now simply execute a loop and requires the TICK interrupt to do anything useful. The TICK interrupt was set up in
fnStartTick() and the interrupt is
RealTimeInterrupt() [also in
Rabbit.c]. This calls the uTasker TICK handler and resets and interrupt flags necessary.
9. To get the simulator to do this it must simulate the TICK timer. I suggest using the LM3S project as reference since its simulator does this in
fnSimTimers() - the LPC project uses an older method which is not as accurate (it will still be called even if the timer is actually disabled...this will be improved). You will see that the simulation part attempts to check that the peripherals are correctly configured, that their interrupst are really enabled and also uses the real vector table to jump to the interrupt routine.
How this is done on the rabbit depends on its hardware and this is what needs to be understood and then simulated.
10. Now it is time to 'migrate' LPC code to Rabbit code. To do this you need to do 4 things.
- add the register and register content defines to
rabbit.h (this is all based on a
struct of the internal peripheral registers:
ucLPC23xx in the LPC)
- add the internal peripheral register struct in
RabbitSim.c and its definition in
simRabbit.h- add the specific peripheral to the register struct (eg.
LPC23XX_TIMER)
- exchange the simulation code in
RabbitSim.c (eg. in
fnSimTimers() to check the present timer configuration, incriment its count value and execute the timer interrupt on timer match).
To get the first TICK operating you may find that you need to add PLL peripherals, Timer peripheral and Interrupt controller peripheral before it will all work (if you are impatient to see it running for the first time this extra work is a bit frustrating). However, once you are sure that it is doing this properly you will understand these modules well enough to not have any problems on the target. If you are convinced enought that the target will operate with the code that you have simulated it probably will do and so it is then time to verify this on the HW. Usually there will be a flag somewhere which you didn't understand correctly but this is mostly a small itteration. [I have created complete drivers in the simulator for chips which I had never used before and sometimes they do run first time on the hardware - when they don't I usually find that the correction is restricted to maybe a register flag which has the wrong polarity or at the wrong location but usually nothing which takes more that a short time to solve.
The message is simply that the work invested in the simulator, although quite intensive at first, usually results in a good pay back later].
11. Some chip customisation.
You will certainly want to do some customisation to the simulator so that it displays the Rabbit chip/module. This requires a simple BMP of the chip to be put in the Rabbit\GUI directory - it is conditionally loaded in WinSimMain.cpp. Also the port simulation can be modified to suit the rabbit processor/module, but this can be the subject of future development steps.
Good luck
Regards
Mark
*1 - modified